WEEK STARTING - 29th of April, 2019
WEEK ENDING - 5th of May, 2019
MONDAY - Fantastical Creatures Modelling workshop
Original post: https://ncarolannua1b.blogspot.com/2019/04/fantastical-creatures-skollcrabb_29.html
TUESDAY - Media Roles Presentation
Original post: https://ncarolannua1b.blogspot.com/2019/04/media-roles-final-presentation-and.html
THURSDAY - Lip-Sync
Original post: https://ncarolannua1b.blogspot.com/2019/05/lip-sync-finalised-animation.html
"So now my animation is all done! I really enjoyed this unit all in all, mostly due to my own bias towards 2D animation. Getting back into it after units which were more experimental & foreign to me was like a nice homecoming, and was definitely a more comfortable way for me to work. I don't really have any major gripes with the sessions, they let us get on, and Katherine was very enthusiastic and helpful! The only thing I'd really change is keeping an eye on consistency. I feel like my lip-sync animation was very successful, and it's probably my favourite piece of animation I've done this year!"
SUMMARY
This week is the final week before hand in, and it's all about getting things fully finished.
The lip-sync feedback has been fully implemented, and now it's finished! I'm really happy with how it came out, it hits the sweet spot of feeling like something I'd make on my own, but with the skills I've learnt since coming to university, mostly how to properly apply the principles and animating on twos. Overall, my thoughts on this project are entirely positive! I got to animate in a way I adore, and work in a medium I'm more comfortable in.
My Fantastical Creature is so close to being finished at this point! The model is all there and textured in Substance Painter, I just need to figure out how to get it back into Maya with the textures all intact and applied correctly. I've got a feeling it's either going to be ridiculously easy or ridiculously difficult. But I want to make it look as good in Maya as it does in Substance Painter, and hopefully the correct application will make that possible. Then it's just a turntable and compositing to do and it'll be a wrap for Fantastical Creatures!
Showing posts with label Week 16. Show all posts
Showing posts with label Week 16. Show all posts
Sunday, May 5, 2019

Friday, May 3, 2019
FANTASTICAL CREATURES - TEXTURING SKOLLCRABB
In this post, I'm going to go over how I textured my Skollcrabb creature.
After getting feedback yesterday on how to bring my model into Substance Painter properly, I started to work on getting my Skollcrabb model finished.
The main feedback I got was on how the seams worked on my model's UVs. Before when I brought it into Substance Painter, all the seams were auto-generated. That meant there were a LOT of faces created from the seams, and drawing on one of them copied it to every face.
So I took each object and worked on each UV again from scratch. I made sure to create enough seams so that when I added a texture onto the shapes, the images wouldn't be stretched out. It was a quick enough process, and finding out about the Layout function made rearranging the UV shells a lot quicker and easier than I thought.
I then applied different lamberts to each object that would have a certain texture on it; the skull & jaw would have one, the head, arms, claws & legs have one, and the eyes have one. That way, when I bring it into Substance Painter, each group of objects under one lambert would be grouped together.
And that's exactly what happened! I had three layers set up at the start, which I nicknamed "BO0O0O0O0ONE!!!", "eyes" and "shell". I tested dragging textures onto different areas of the Skollcrabb, and sure enough, only certain areas got affected; the ones grouped together!
From there, it was a process of finding the right look. I messed about with two main textures for the skull & jaw; a preset for bone that looked like bone but didn't give off the exact effect I wanted, and a matte porcelain preset with a cracked texture. I ended up going with the porcelain one, since the cracks looked a lot closer to what I wanted. I was also able to change the base colours, so it'd look more like off-white, signifying the age of the shell.
The actual shell body underneath the skull was textured using a rust preset. It gave off a battered, layered look, which looked really nice when I changed the base colour to a dark purple.
Finally, the eyes. These were by far the easiest to texture; white gloss with drawn on pupils. While I was drawing on the model, I also added 2D looking eye holes, nose hole and teeth.
And in the end, the Skollcrabb model looks like this:
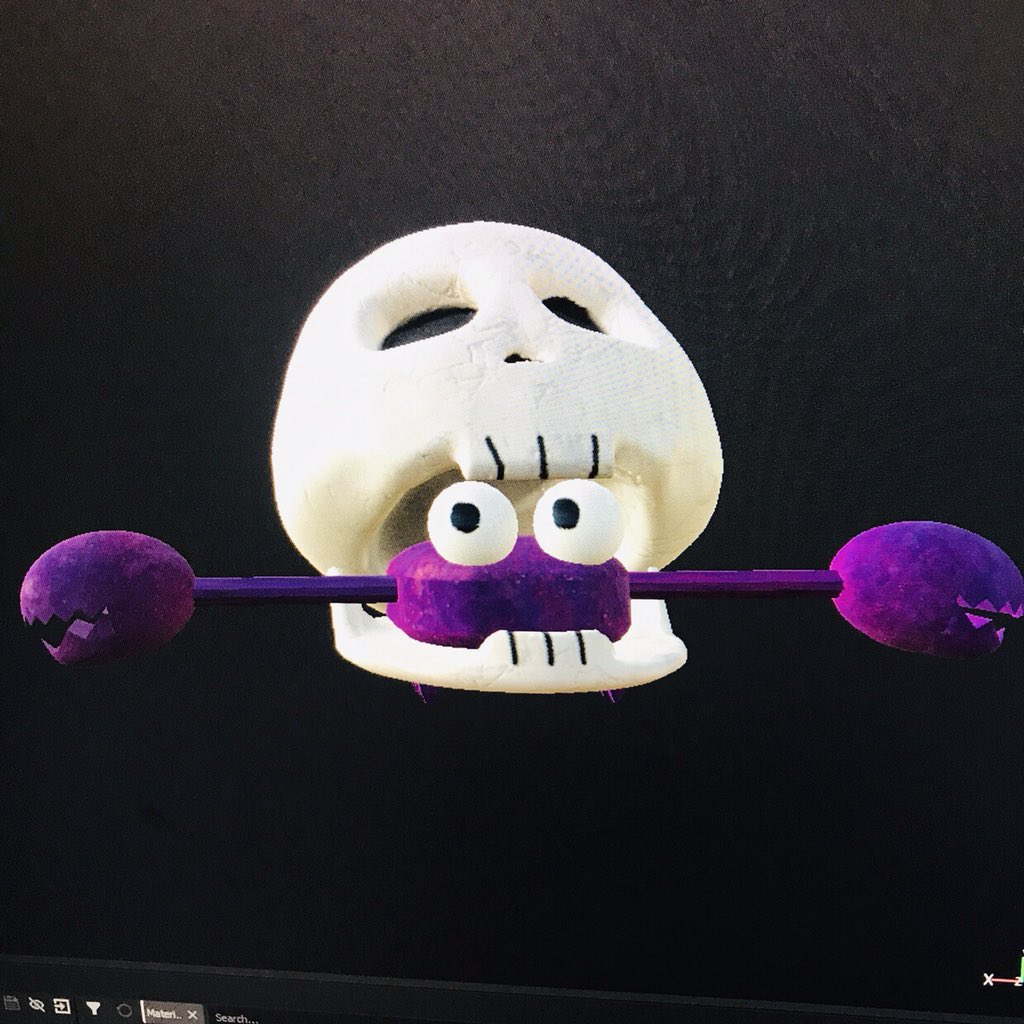
I'm REALLY happy with how it turned out! This is exactly what I envisioned Skollcrabb looking like in 3D with textures, and it's the first time I've taken one of my characters and made it 3D, so it's a big deal for me! I'm glad that after so much trial and error, I have a textured Skollcrabb that looks as good as it does! Next step from here is bringing the textures back into Maya and creating a turnaround, as well as some composited images.
After getting feedback yesterday on how to bring my model into Substance Painter properly, I started to work on getting my Skollcrabb model finished.
The main feedback I got was on how the seams worked on my model's UVs. Before when I brought it into Substance Painter, all the seams were auto-generated. That meant there were a LOT of faces created from the seams, and drawing on one of them copied it to every face.
So I took each object and worked on each UV again from scratch. I made sure to create enough seams so that when I added a texture onto the shapes, the images wouldn't be stretched out. It was a quick enough process, and finding out about the Layout function made rearranging the UV shells a lot quicker and easier than I thought.
I then applied different lamberts to each object that would have a certain texture on it; the skull & jaw would have one, the head, arms, claws & legs have one, and the eyes have one. That way, when I bring it into Substance Painter, each group of objects under one lambert would be grouped together.
And that's exactly what happened! I had three layers set up at the start, which I nicknamed "BO0O0O0O0ONE!!!", "eyes" and "shell". I tested dragging textures onto different areas of the Skollcrabb, and sure enough, only certain areas got affected; the ones grouped together!
From there, it was a process of finding the right look. I messed about with two main textures for the skull & jaw; a preset for bone that looked like bone but didn't give off the exact effect I wanted, and a matte porcelain preset with a cracked texture. I ended up going with the porcelain one, since the cracks looked a lot closer to what I wanted. I was also able to change the base colours, so it'd look more like off-white, signifying the age of the shell.
The actual shell body underneath the skull was textured using a rust preset. It gave off a battered, layered look, which looked really nice when I changed the base colour to a dark purple.
Finally, the eyes. These were by far the easiest to texture; white gloss with drawn on pupils. While I was drawing on the model, I also added 2D looking eye holes, nose hole and teeth.
And in the end, the Skollcrabb model looks like this:
I'm REALLY happy with how it turned out! This is exactly what I envisioned Skollcrabb looking like in 3D with textures, and it's the first time I've taken one of my characters and made it 3D, so it's a big deal for me! I'm glad that after so much trial and error, I have a textured Skollcrabb that looks as good as it does! Next step from here is bringing the textures back into Maya and creating a turnaround, as well as some composited images.
Thursday, May 2, 2019
LIP SYNC - FINALISED ANIMATION
This post is looking at my final lip-sync animation, which I've been working on in TVPaint.
Last lip-sync session, I got feedback from Helen on how to improve the animation, which is to retain consistency better. The hair and hairline was the main issue, with the hair changing in shape & volume little by little, and the hairline having a jittery effect to it.
I fixed this up by just doing the head all over again, starting with a new rough animation layer and then doing lineart again. And within the session, I was pretty much done.
So now my animation is all done! I really enjoyed this unit all in all, mostly due to my own bias towards 2D animation. Getting back into it after units which were more experimental & foreign to me was like a nice homecoming, and was definitely a more comfortable way for me to work. I don't really have any major gripes with the sessions, they let us get on, and Katherine was very enthusiastic and helpful! The only thing I'd really change is keeping an eye on consistency. I feel like my lip-sync animation was very successful, and it's probably my favourite piece of animation I've done this year!
Last lip-sync session, I got feedback from Helen on how to improve the animation, which is to retain consistency better. The hair and hairline was the main issue, with the hair changing in shape & volume little by little, and the hairline having a jittery effect to it.
I fixed this up by just doing the head all over again, starting with a new rough animation layer and then doing lineart again. And within the session, I was pretty much done.
So now my animation is all done! I really enjoyed this unit all in all, mostly due to my own bias towards 2D animation. Getting back into it after units which were more experimental & foreign to me was like a nice homecoming, and was definitely a more comfortable way for me to work. I don't really have any major gripes with the sessions, they let us get on, and Katherine was very enthusiastic and helpful! The only thing I'd really change is keeping an eye on consistency. I feel like my lip-sync animation was very successful, and it's probably my favourite piece of animation I've done this year!
Tuesday, April 30, 2019
MEDIA ROLES - FINAL PRESENTATION AND OVERALL PERFORMANCE ANALYSIS
Today, we had our actual real presentation of our findings for the Media Roles research task. We've spent time putting our slides together, making one cohesive presentation. We all worked on our individual slides, then established a uniform look and format.
We were alongside groups 1 to 4 for a morning session, where we all presented to each other, as well as Peter, Helen and Jon. I felt quite nervous, since I was worried that I'd mess something up during the presenting, or that I'd done something wrong in the slides that I hadn't caught up until then. But when we finally came to actually present, it went pretty well.
We established an order for who would say what:
Now, I say the presentation went pretty well. Why not good or great? Because I feel like members of our group wasn't 100% there. The presentations of each others slides started to dip in quality, and in some cases, it was clear that more rehearsal time was needed. One person spoke for too long, speaking more about the studio than the actual area he was meant to be talking about. Gauging reactions afterwards from audience members, I found they also found he went on too long. Another person went too quick, and was incredibly quiet so barely anyone could hear him; I was up at the front with him and I couldn't hear him.
I feel like my slides went well, which was further affirmed by Peter and Helen bringing up me and my points directly when getting positive feedback on our presentations. Both Tanje and myself got positive feedback on how we seemed to be leading the team well. In my head, this did make me glad; for most of this project, it felt like the two of us had to carry the team a lot, so it was nice knowing our hard work getting everyone together paid off.
Now that the presentation and research task is over, is there anything I'd change? Yes, a couple of things.
First off, the presentation itself. I'd want to make sure it was all prepared a LOT better in the start, and that everyone was on the same page. Looking at all the slides put together, some of the less vocal members definitely didn't get the format as much as others, which lead to a lot of reformatting and trimming down. Making sure everyone's got the same idea is essential.
Another more personal thing I'd want to change is adding a little bit more, for lack of a better term, showmanship to the presentation. With the other groups, they managed to get a few chuckles and laughs from making little jokes and adding funny things into their slides. I tried to get some kind of reaction from the audience twice through what I was saying, in an attempt to keep audience retention; they laughed once. If I had to do this again, I'd definitely want to make a more engaging, entertaining slideshow.
Finally, the biggest thing I'd change is getting the group presentation ready. It was clear that not everyone was ready for this, but for more than just nerves. Unpreparedness and a somewhat lack of interest was also at play. I'd make my group more prepared if we did it again, even if it means I have to keep getting everyone together to practice.
So, to reiterate my aforementioned feelings towards this presentation, it all went pretty well. And that's about it.
(Our final presentation we showed)
We established an order for who would say what:
- I would start by introducing the presentation and explaining what area we looked into
- Tanje would take over talking about the pre-production pipeline, and her slides on Monsters University's production design
- I would then go on to talk about Moana and character design
- Gareth would talk about Blur Studios and 3D character modelling
- Jacob would talk about Ori and the Blind Forest and it's art direction
- Tom would talk about Spyro and the 2D to 3D process
- We'd all read the conclusion on what the biggest thing we took away was
Now, I say the presentation went pretty well. Why not good or great? Because I feel like members of our group wasn't 100% there. The presentations of each others slides started to dip in quality, and in some cases, it was clear that more rehearsal time was needed. One person spoke for too long, speaking more about the studio than the actual area he was meant to be talking about. Gauging reactions afterwards from audience members, I found they also found he went on too long. Another person went too quick, and was incredibly quiet so barely anyone could hear him; I was up at the front with him and I couldn't hear him.
I feel like my slides went well, which was further affirmed by Peter and Helen bringing up me and my points directly when getting positive feedback on our presentations. Both Tanje and myself got positive feedback on how we seemed to be leading the team well. In my head, this did make me glad; for most of this project, it felt like the two of us had to carry the team a lot, so it was nice knowing our hard work getting everyone together paid off.
Now that the presentation and research task is over, is there anything I'd change? Yes, a couple of things.
First off, the presentation itself. I'd want to make sure it was all prepared a LOT better in the start, and that everyone was on the same page. Looking at all the slides put together, some of the less vocal members definitely didn't get the format as much as others, which lead to a lot of reformatting and trimming down. Making sure everyone's got the same idea is essential.
Another more personal thing I'd want to change is adding a little bit more, for lack of a better term, showmanship to the presentation. With the other groups, they managed to get a few chuckles and laughs from making little jokes and adding funny things into their slides. I tried to get some kind of reaction from the audience twice through what I was saying, in an attempt to keep audience retention; they laughed once. If I had to do this again, I'd definitely want to make a more engaging, entertaining slideshow.
Finally, the biggest thing I'd change is getting the group presentation ready. It was clear that not everyone was ready for this, but for more than just nerves. Unpreparedness and a somewhat lack of interest was also at play. I'd make my group more prepared if we did it again, even if it means I have to keep getting everyone together to practice.
So, to reiterate my aforementioned feelings towards this presentation, it all went pretty well. And that's about it.
Monday, April 29, 2019
FANTASTICAL CREATURES - SKOLLCRABB MODELLING #2
This was the first session back after Easter, bringing me back to the Fantastical Creature modelling!
Over Easter, I thought I'd finished my Skollcrabb model, filling all the necessary gaps and fixing anything that didn't work so well. But the key word there is "thought". As it turns out, when I imported my Skollcrabb into another program, it came up with a LIST of errors.
I got Jon to give me feedback on the model, hoping he could point out what was wrong. His main feedback was to do the skull again, since that seemed to be causing me the most problems. The skull had gaps in the mesh, vertices & edges weren't meeting, but my biggest downfall was my polygons. I'd forgotten that these models had to made from 4 sided polygons, but my inclusion of polygons with sides ranging from 3 to 20 was my biggest issue.
Instead of starting the skull again from scratch, Jon advised that I retopologise it. Retopology is the process of creating a new poly-model using another poly-model as reference; it's essentially tracing in 3D. You place 4 points down to create the basis of a polygon and then fill the gaps, adding to your new shape.
So I got started on retopologising the skull! I also plan on doing this for the bottom jaw as well, since that also seems to be a problem area for the model. But I got about halfway through the skull by the end of this session, so I'm definitely coming back to work on it more.
Over Easter, I thought I'd finished my Skollcrabb model, filling all the necessary gaps and fixing anything that didn't work so well. But the key word there is "thought". As it turns out, when I imported my Skollcrabb into another program, it came up with a LIST of errors.
I got Jon to give me feedback on the model, hoping he could point out what was wrong. His main feedback was to do the skull again, since that seemed to be causing me the most problems. The skull had gaps in the mesh, vertices & edges weren't meeting, but my biggest downfall was my polygons. I'd forgotten that these models had to made from 4 sided polygons, but my inclusion of polygons with sides ranging from 3 to 20 was my biggest issue.
Instead of starting the skull again from scratch, Jon advised that I retopologise it. Retopology is the process of creating a new poly-model using another poly-model as reference; it's essentially tracing in 3D. You place 4 points down to create the basis of a polygon and then fill the gaps, adding to your new shape.
So I got started on retopologising the skull! I also plan on doing this for the bottom jaw as well, since that also seems to be a problem area for the model. But I got about halfway through the skull by the end of this session, so I'm definitely coming back to work on it more.
Subscribe to:
Posts (Atom)