Showing posts with label Maya. Show all posts

Tuesday, May 7, 2019

FANTASTICAL CREATURES - SKOLLCRABB TURNTABLE

This post is going to be going over our very last dedicated Fantastical Creatures session. I got two main things accomplished this session: brought Skollcrabb's textures back into Maya from Substance Painter, and made Skollcrabb's turntable.

First, I'll start with the texture reapplication. This was a kind of fiddly process, involving a lot of different nodes in the material pop-up menu. I applied each relevant texture file to where they needed to be, following the tutorial Jon had written. It all seemed like it wasn't working as I went further in, but when I pressed render, Skollcrabb's textures were applied! I'm so glad this worked, as I was worried it would all go wrong.


Once I had a fully textured and renderable Skollcrabb, it was time to make him a turntable. We were given a turntable template file, which had a spinning disk that spun 1 full rotation for exactly 5 seconds. I had to reference the Skollcrabb into the file, and then parent it to the spinning disk. By doing this, whenever the disk moves, the Skollcrabb would move too.

I rendered the turnaround and put the .EXR file sequence into After Effects, and ended up with a nice looking turnaround!


All in all, I'm glad to have finished my model entirely! All I really have left is to composite Skollcrabb onto some still photos, which I'm really looking forward to! It'll be fun to make Skollcrabb seem that little bit realer! This session was an all around success the entire way through; nothing went wrong, and the two things I did within 3 hours were tasks I imagined would take me all week! So I'm very happy with today's work!

Friday, May 3, 2019

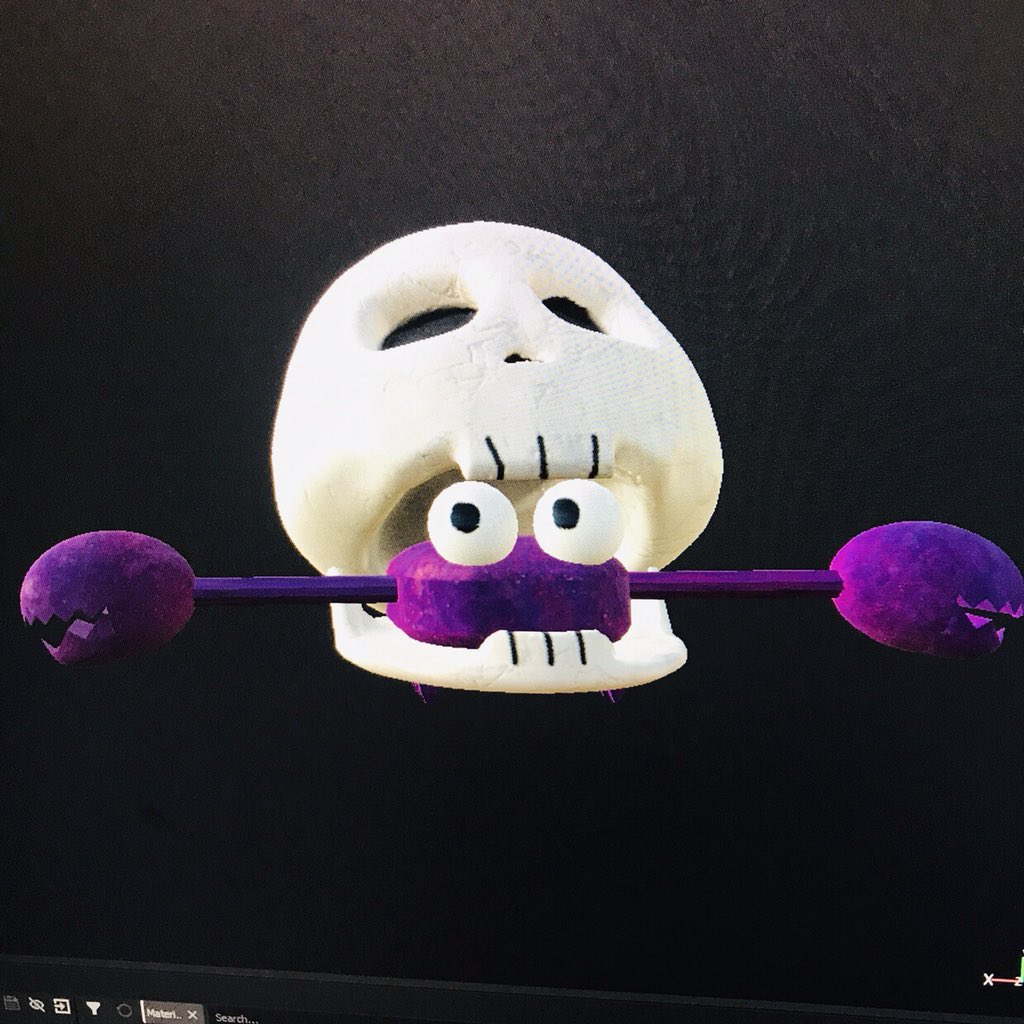
FANTASTICAL CREATURES - TEXTURING SKOLLCRABB

In this post, I'm going to go over how I textured my Skollcrabb creature.

After getting feedback yesterday on how to bring my model into Substance Painter properly, I started to work on getting my Skollcrabb model finished.

The main feedback I got was on how the seams worked on my model's UVs. Before when I brought it into Substance Painter, all the seams were auto-generated. That meant there were a LOT of faces created from the seams, and drawing on one of them copied it to every face.

So I took each object and worked on each UV again from scratch. I made sure to create enough seams so that when I added a texture onto the shapes, the images wouldn't be stretched out. It was a quick enough process, and finding out about the Layout function made rearranging the UV shells a lot quicker and easier than I thought.

I then applied different lamberts to each object that would have a certain texture on it; the skull & jaw would have one, the head, arms, claws & legs have one, and the eyes have one. That way, when I bring it into Substance Painter, each group of objects under one lambert would be grouped together.

And that's exactly what happened! I had three layers set up at the start, which I nicknamed "BO0O0O0O0ONE!!!", "eyes" and "shell". I tested dragging textures onto different areas of the Skollcrabb, and sure enough, only certain areas got affected; the ones grouped together!

From there, it was a process of finding the right look. I messed about with two main textures for the skull & jaw; a preset for bone that looked like bone but didn't give off the exact effect I wanted, and a matte porcelain preset with a cracked texture. I ended up going with the porcelain one, since the cracks looked a lot closer to what I wanted. I was also able to change the base colours, so it'd look more like off-white, signifying the age of the shell.

The actual shell body underneath the skull was textured using a rust preset. It gave off a battered, layered look, which looked really nice when I changed the base colour to a dark purple.

Finally, the eyes. These were by far the easiest to texture; white gloss with drawn on pupils. While I was drawing on the model, I also added 2D looking eye holes, nose hole and teeth.

And in the end, the Skollcrabb model looks like this:


I'm REALLY happy with how it turned out! This is exactly what I envisioned Skollcrabb looking like in 3D with textures, and it's the first time I've taken one of my characters and made it 3D, so it's a big deal for me! I'm glad that after so much trial and error, I have a textured Skollcrabb that looks as good as it does! Next step from here is bringing the textures back into Maya and creating a turnaround, as well as some composited images.

Monday, April 29, 2019

FANTASTICAL CREATURES - SKOLLCRABB MODELLING #2

This was the first session back after Easter, bringing me back to the Fantastical Creature modelling! 

Over Easter, I thought I'd finished my Skollcrabb model, filling all the necessary gaps and fixing anything that didn't work so well. But the key word there is "thought". As it turns out, when I imported my Skollcrabb into another program, it came up with a LIST of errors. 

I got Jon to give me feedback on the model, hoping he could point out what was wrong. His main feedback was to do the skull again, since that seemed to be causing me the most problems. The skull had gaps in the mesh, vertices & edges weren't meeting, but my biggest downfall was my polygons. I'd forgotten that these models had to made from 4 sided polygons, but my inclusion of polygons with sides ranging from 3 to 20 was my biggest issue.

Instead of starting the skull again from scratch, Jon advised that I retopologise it. Retopology is the process of creating a new poly-model using another poly-model as reference; it's essentially tracing in 3D. You place 4 points down to create the basis of a polygon and then fill the gaps, adding to your new shape.

So I got started on retopologising the skull! I also plan on doing this for the bottom jaw as well, since that also seems to be a problem area for the model. But I got about halfway through the skull by the end of this session, so I'm definitely coming back to work on it more.

Monday, April 1, 2019

FANTASTICAL CREATURES - SKOLLCRABB MODELLING 1

This session was modelling my Skollcrabb creature in Maya.

When starting to model the Skollcrabb, I already had an idea of how it works in a 3D space, thanks to the maquette. But now came the part where it actually had to exist in a 3D digital space.

After our session learning how to start modelling characters last week, I felt like making my Skollcrabb would be a lot easier than if I hadn't had that session. Each part was made up of different poly shapes; the skull, body & eyes were made from spheres that I had edited to resemble the shapes I wanted more, the bottom half of the legs were made of cones, the top half of the legs were made of cylinders, and the bottom jaw.

The most complex shape by far was the skull shell; where other parts of the Skollcrabb didn't require too much modification, the skull needed constant changes and modelling techniques to make it resemble what I wanted.

I also tried closing off as many gaps as I could with the skull, but it's going to prove difficult in later sessions, just due to how I made it. By the end of the session, the Skollcrabb was in pieces:


The only real next step is to just carry on modelling. I still need to add the arms and claws, and then bring it into texturing software to make him colourful and textured!

Monday, March 25, 2019

FANTASTICAL CREATURES - MODELLING INTRODUCTION

This session was our first on character modelling in Maya, before we start modelling our own chosen Fantastical Creatures.

The task of what we were going to make was fairly simple, it was just going to be an abstract form of a man made from a cube. From there, we'd go on to make slight changes and use new tools.

We started, as mentioned with a cube. We grabbed the top face and extruded upwards twice, so that we ended up with a cuboid, essentially made from three cubes. We kept extruding, re-scaling and cutting faces until we got a very basic man.


From there, we went on to make him a little less basic. Added features to more resemble actual human anatomy made the model seem less blocky, and more like a stylised character. For my guy, I gave him little stumpy feet, more prominent pectorals and a shaped head.


Once we had our blocky man, our next step was smoothing him. By smoothing the character, Maya made the edges more rounded, and made him higher poly (made up of more polygons). In my case, this resulted in a character who looks somewhat decent from the feet up to the neck, and then the head is just an egg. It looks SO much like an egg after the smoothing process.


Once we had our smoothed out model, we started to use tools I've personally not encounted before; the sculpting tools. The toolset is preinstalled into Maya, and allows the user to manipulate surfaces however they want. Things can be pinched, made jagged, cut into, etc., and the changes will stay there.

We messed about with these tools for a bit, just to get to grips with them. In the end, my smoothed out egg man looked like what I've dubbed as "Human Jar Jar Binks", due to it's large billed mouth and eye stalks.


Our final experimentation with sculpting was in a program called Mudbox, another Autodesk package. It's specifically made for sculpting and modelling, with no real functionality outside of that. I found the program less user friendly, and ultimately a lot more tricky to use. I wanted to try and recreate elements of the character Thanos' design, but parts of the model kept getting dragged out and warping where I didn't want them to.

(My Thanos (left) facing Sam's Sonic (right))

This session was a nice introduction to the entire modelling aspect of this unit! And it's a good thing I think that, because we're going to be doing a LOT of it. I'm not looking forward to more of Mudbox though, I wasn't a fan of that. However, my Skollcrabb design doesn't seem like it would involve much sculpting, since it's shell is meant to be smooth without any kind of real divots or cracks. But I'm excited to get started on making Skollcrabb a digital model!

Thursday, March 14, 2019

MYSTERY BOX - SESSION #5

This post is looking at another Mystery Box CG session.

Before we got on with our work, we were shown how the animation timeline works more thoroughly. The timeline in animation mode, when selecting a certain element that's able to be animated, will show a series of strings and lines that represent different aspects of how that part is moving. For example, a line going up when looking at the "TranslateY" attribute signifies the object is moving upwards. 

There's processes to change the line type of your animation too, being able to switch from stepped to splined, among other combinations. These are going to be necessary later on, since Max needs to move smoothly and without just teleporting to places.

By the end of this session, I got my main blocking all done! Max now has all his basic movements down, and with a couple more tweaks, he should be ready for splining! Those tweaks, along with things I fixed today, were done with the animation timeline editor. It's a really useful tool, and I'm glad we managed to learn how to use it to our advantage!

Monday, March 11, 2019

MYSTERY BOX - MAYA SESSION #4

Further development on Mystery Box animation in this session.

There wasn't anything huge in terms of the session itself, but I got some good feedback from Jon. He had a look at my blocked-out animation, and while it was alright, he pointed out how difficult it's going to be to work on later down the line. He said that making a walk cycle between two blocked-out poses would be difficult, especially matching the end of the walk to the final pose it needs to get to.

The easiest option? Start from scratch. I was fine to do this; while it was a little bit irritating, I'd rather have an animation that's both easier to work on and looks good over one that's tricky to work on and would look so-so.

So that's what today was, just working on the animation again from the start. It's good that I learnt certain workarounds and shortcuts for setup. The camera is all set up the same, the box is still there, I just need to clean up the animation of the previous version in this new version! 

Apart from that, I didn't have much going on in this session.

Thursday, March 7, 2019

MYSTERY BOX - MAYA SESSION #3

In this session, I carried on with my Mystery Box animation.

Before we started on our own animations, we did a small exercise involving Max. We were given a file of Max sitting at a desk with a computer. He was set in a default sitting position, and our task was to show two different expressions with Max, using his body language and facial features. He had to be looking at something on the computer, and then react horrified to what he saw.


After we had our poses, we splined the two to create a short smooth animation.

After this exercise, it was essentially business as usual. After getting some feedback from Jon, I was advised to redo my walk cycle, just because it was looking a little bit weird with things clipping and, when splining comes in, sliding. So I did just that! At the end of this session, I managed to get all my major blocking done. Ignoring the walk cycle that's going to be fixed up, Max now:

  • Sees the box
  • Turns to look at it
  • Checks his watch
  • Looks back
  • Ends up next to the box
  • Crouches down
  • Looks inside
  • Stands back up in shock
  • Points to the box
  • Hands in the air
  • Starts leaving

So my next step is... steps, essentially. Make Max actually walk over to the box, and fix up the walk cycle that I've got going on at the moment. Feeling like good progress made this session!

Monday, March 4, 2019

MYSTERY BOX - MAYA SESSION #2

This post is on our continuation of our CG Mystery Box animation!

For this session, I managed to get an actual proper start on my animation, where we were given a little more free reign of what we did in the session. But beforehand, we were given probably the most important piece of advice we could get for this project; how to animate in stepped.

Stepped animation is different from the final product due to it's rigidness and stiffness. Stepped doesn't spline or guess the movement between two keyframes, it just IS those keyframes. The movements snap from one pose to the next. 

Working in stepped is similar to how I animate in 2D, working out the key poses first, seeing how it looks, then going back and filling in the gaps.

With that helpful advice, I started to animate my sequence. I got my camera all set up, so that it would match the same framing setup as my animatic. Then I started to work on the first part of my animation, which is the walk past the box. I switched to a side view so that I could have a locked camera to Max's side, and I could work on it essentially the same way I would a 2D walk cycle.

Not much to say for this session apart from that, just gotta keep working on the animation.

Thursday, February 28, 2019

MYSTERY BOX - MAYA SESSION #1

Today we started actually animating our Mystery Box project.

Before the animation started, we had to choose which discipline we wanted to use for it; CGI or Stop Motion. I chose CGI, mostly because it was the only one of the main 3 disciplines where I didn't know how to animate characters, and wanted to get as broad experience with character animation as possible.

Speaking of which, the character rig we're using is from the website 11 Second Club, a site where animators are challenged every month to create animations around a certain idea. Aside from that, they also provide character rigs, one of which being called Max. Max is a simple human rig, resembling the wooden figures used to work on posing.

Image result for 11 second club max
(A screenshot from MAX-verse expedition, an animation created as a part of one of the 11 Second Club's monthly competitions - credit: Paul Jun-Ho Chang)

Max has lots of controls for every joint in his body, from big joints like the hips and shoulders all the way down to individual finger controls. These can all be edited using Maya's rotate tool (or in some cases, like the shoulders, can also use the normal directional controls). Modification of one part can also influence other body parts to move too; for example, rotating the hips also rotates everything above the hips, instead of just the one joint.

Using Max, we used this session to mostly play around with the rig and get to grips with it. We had a light brief of making Max perform poses. Our first prompt was "waiting for the bus", followed by the emotions happy and sad, and we also got the chance to put our own pose in as well.

I found this pretty easy, and actually fun to do! It was a lot easier to make the character pull poses than I thought it'd be, and having accessible ways to make the character move around with the different handles was definitely a factor into making it a much more pleasant experience than it could've been.

(Waiting for the Bus)

(Happy)

(Sad)

("You Know I Had To Do It To 'Em" with reference)

To finish off the session, we very briefly started looking into how to make a walk cycle. We were recommended to use a different camera angle for it, specifically one that's fixed. Maya has two preset angles perfect for this; left and right cameras. They let you see from the chosen angles, without the ability to scrub across the Z axis, leaving you with essentially a 2D plain.

<video>

Overall, I enjoyed this first session of Mystery Box animation! It was a lot easier and much more interesting to figure out how character rigs work than I initially thought! I don't know exactly what I was expecting, since the only time I've seen CG character animation behind the scenes was from old Toy Story featurettes, but given they're from 1995 and it's been nearly 25 years since then, the techniques are probably easier than back then. Looking forward to more!

Sunday, February 10, 2019

WEEK 8 SUMMARY

WEEK BEGINNING - February 4th, 2019
WEEK ENDING - February 10th, 2019

MONDAY - Stop Motion Change of Expression

<to be added>

WEDNESDAY - Maya UV Application

Original blog post: https://ncarolannua1b.blogspot.com/2019/02/cgi-applying-textures.html

- "And that wraps up the final dedicated Maya session! I really enjoyed working on all of this, and unexpectedly so! I was worried that CGI and CG Modelling would be really intricate, and that unless you had years of experience, you would NOT get it. But it was relatively easy to get the hang of, and I really enjoyed it at times! I think CGI is definitely a path to consider going forward, especially with the Mystery Box project looming."

SUMMARY

This week didn't really have too much on, and of it, nothing was really spectacular or made me really excited. So in general, this week was pretty good. 

Maya was definitely the best part of this week. These sessions are always the most fun to be in, and I think it's a really good sign that you're loving what you're doing when people are laughing really hard at the assigned work. Not in the sense that we're making fun of it, but in that it's such a good time already working on the project with little difficulty, that spirits and laughs are high! The cereal box and bird tasks were fun, and I definitely think CGI is my route to go with the Mystery Box project we have coming up!

Stop Motion was a more interesting experience this time more than any. I was working in a group of 3 this time, and we all had a somewhat similar idea of what we wanted to make. We communicated well, and came out with an animation we were all really happy with! The most interesting thing to me was after the session, when I showed people the animation; they genuinely believed the emotion being performed. I showed people only with the context "there's an emotional change midway through"... and people felt the need to say "aww" when the sadness started. I think that's a good indication that we got the emotion down! Is stop motion for me going forward though? Maybe? It's certainly something to consider, but out of the three main animation forms (2D, CGI and Stop Motion), it's definitely falling in 3rd place.

Narratology essay is at the point where I have my points all ready to go; now I need to find more reliable sources than just my own memory. I'm going to try using a question I build around the template, going much more down the route of "Is animation intrinsic to WFRR" or "If animation was removed, could you get the same experience from WFRR". Something like that could be better in finding a point better to focus on. But if I struggle with that, then I can swap in the template question and use that to refer back to instead.

Sketchbook was back up and running this week, a lot more like previous weeks in terms of what I'm making with it. Motivation has risen again, and I'm glad that it is! I've had some ideas I've thought were really cool, including a comic that can only be viewed using a UV light; getting some more unique materials in there! Generally, getting back into the swing of it!

Thursday, February 7, 2019

CGI - APPLYING TEXTURES

This session was our final on the Maya workshops, and looked at how to apply UVs to models.

A UV is an overlay that goes on top of your 3D models. The term UV comes from the fact that those are the axis the textures fall under; X, Y and Z were already taken. They're typically applied on top of unfolded versions of models, making them as flat as possible to easily lay out textures.


The left half of this frame from Cars 2 has basic color information while on the right side all the shaders have been applied.
(The left shows basic 3D shapes & models, the right shows the rest of the scene with UVs on top - credit: Pixar Animation Studios, The Science Behind Pixar)

Our first UV task was to take the net of a C-3PO's cereal box and try to map the net of a cuboid onto it. 
Related image
(C-3PO's, a legitimate cereal from the 70s, based on Star Wars - credit: Kellogg's)

We were introduced to a new workspace layout for this task, designed exactly for UV application; the UV Editor. It creates a splitscreen window; one screen showing your whole model, the other showing the selected model's flat net. From there, you can take faces and put them on top of imported graphics.

Image result for maya uv editor
(The UV Editor being used on a model of a head)

We learnt how to split edges too. For 3D shapes, every two consecutive faces share at least one edge. This is an issue here because trying to move one face will also cause any faces it's connected to to alter itself too. Because of this, we can split edges apart, and have it so moving one face doesn't affect it's other connected faces.

Once I had 6 individually moving faces, I moved them around to the right place. Once on the right face corresponding to the cereal box, I used a UV Vertex manipulation tool to resize each one from being a perfect square into some form of rectangle.

Once the cereal box was all lined up, it looked good! With our completed nets, we learned how to export our nets as templates, and were given the chance to mess about in Photoshop and create our own cereal brand! I wanted to have some fun with it, so I came up with a cereal called "Memers"; a cereal where the box is just covered in memes and jokes.

After the cereal boxes were done, we moved onto "the bird". The bird was essentially a task to demonstrate how to split, unfold and individually texture parts of an already completed 3D model.

For this, we had to split the model of the bird given to us. Keeping the UV view and model view, the faces needed for one section ALL had to be selected. Then by selecting the "Camera View" button, the UV Editor window laid out the net of what was selected, as best it can. 

When you just do that one step, you're still left with a 3D, somewhat enclosed model. So from here, we had to split the component even further, by the seams. Thinking as if it was a stuffed animal of sorts, we made seam lines where two flat halves would've connected together. There were also adjustments made if necessary; sometimes areas would be red or blue, representing things being too tight or too stretched, respectively. While not necessary to fix, it makes UVs applied look weird so it's best to fix them.

The process was done for the head, beak, body, wings and legs. The most difficult one, by far, was the legs. The pointed claws with tightened points proved a challenge in untightening, and I even reached a stage where one toe tightened where another one stretched. I kept making seam splits until it all worked, somehow.

The final thing we did was add some colour! We used Maya's in built pen tool, found under the Rendering tab.

(My fully coloured bird and a box of Memers)

And that wraps up the final dedicated Maya session! I really enjoyed working on all of this, and unexpectedly so! I was worried that CGI and CG Modelling would be really intricate, and that unless you had years of experience, you would NOT get it. But it was relatively easy to get the hang of, and I really enjoyed it at times! I think CGI is definitely a path to consider going forward, especially with the Mystery Box project looming.

Sunday, February 3, 2019

WEEK 7 SUMMARY

WEEK BEGINNING - January 28th, 2019
WEEK ENDING - February 3rd, 2019

MONDAY - Maya Modelling, Stop Motion Box

Original blog posts: <to be added>

TUESDAY - Narratology Check-In

Different sort of session today; it was just me and one other person going to meet up with Lynsey and discuss our essay plans. I said that I wanted to look at how animation was intrinsic to Who Framed Roger Rabbit's plot, and that the two are practically inseparable. I suggested some points involving the character Betty Boop, the Toontown location and how certain events relied on the animation medium. In response, Lynsey offered up some of her own ideas, including some helpful advice on how to write about Jessica Rabbit. I also found from this session that the conclusion should be bigger than last time, and a lot more rich in what I'm trying to say. A helpful session! Definitely going to be applied to my essay plan.

SUMMARY

This week was pretty great! I enjoyed everything I had on, which I'm pleased with! I've already gone over how Narratology's going, so here's my final summaries on everything else this week.

The Maya modelling was, just like last week's introduction, a lot easier than expected. I really enjoyed making the assigned objects, so much so that during our break in the middle I just kept making more things to go alongside them! One thing I did find a little bit weird to get a grasp of was the colouring paired with selection tools. There'd be an instance where I thought I had the right areas selected to apply a texture, and then when I did, it would texture everything else. I already need to go back and redo the radio task, the one I had this issue with, so hopefully I can figure out what's up with it there.

Stop Motion was a lot more fun this week than last, mostly due to the workflow feeling a lot better. I was working with someone who really understood what I was trying to get at with suggestions, and I feel like it was mutual between the two of us. Armatures are a lot easier to work with than Plasticine balls on wires, surprisingly enough. They don't fall apart as easily, and you can get better looking consistent movements from them. The wire and sockets can't physically change shape like the Plasticine can, so it made animations look weird and inconsistent. Luckily, armatures don't have that, and everything went well! Main thing to remember for next time is don't knock the camera. And if you do, then don't panic for too long.

Sketchbook is still at the same point as last week, where motivation seems down for it and not very much is getting done. I don't want to force myself to fill pages, because then I'm not really putting my all into what I'm doing. But at the same time, actually getting up and doing it is what could get me back into the flow of it. I'm gonna have to try exclusively doing my comics and then hopefully adding in little things if sparks of ideas crop up.

Sunday, January 27, 2019

WEEK 6 SUMMARY

WEEK BEGINNING - January 21st, 2019
WEEK ENDING - January 27th, 2019

MONDAY - Maya introduction

Original blog post: https://ncarolannua1b.blogspot.com/2019/01/cgi-introduction.html

- "Overall, I'm really happy with both the animation and the introduction to Maya in general! Being completely honest, I was not expecting myself to find Maya as (for lack of a better term) easy and user friendly as it was; I actually understood it, unlike After Effects. Everything is laid out how I would've expected it, and things do what you want! It shares traits to other programs I've dabbled with, but in a way that makes the translation from 2D to CGI usage easy to understand! While I'm happy with the animation that came out of this session, I think I want to go back and add in more details; model in a barn, a background, and more cows to make a more interesting animation!"

TUESDAY - Narratology: Animation is a Uniquely Visual Medium

Original blog post: https://ncarolannua1b.blogspot.com/2019/01/narrative-animation-is-uniquely-visual.html

- "And that was the final lecture on Narratology! At this point, we should have a film in mind, or at least have whittled it down to 2 choices. I'm sticking with Who Framed Roger Rabbit? for my film; it fits into my chosen question format too well. From here, I need to settle on a plan of action for the essay, and do deeper research."

THURSDAY - Stop Motion introduction

<to be added>

SUMMARY

This first week for a couple of things, and I loved one a LOT more than the other.

The CGI / Maya introduction was the one I really liked! CGI was my introduction to animation, and watching films like Toy Story and Shrek really inspired me to go into animation. I learnt later on that CGI was allegedly very difficult, even the simplest things. But now I've done the simplest things and discovered that they weren't too difficult, it puts my mind at ease a LOT. Despite only having one session on CGI, I feel like I've absolutely fallen for it; definitely a medium I'm looking forward to doing more of!

Stop Motion... isn't as enjoyable as I imagined, or as I remember from past experience. The process is a lot more fiddly and complex than I recall, and you really need a good sense of patience when you do it; and I'm willing to admit one of my faults is lack of patience. Maybe this session with the bouncing ball was a one-off? Things kept falling apart, and injuries were almost sustained (luckily, no-one was actually hurt). When we move onto armatures, hopefully it'll be less... personally frustrating.

We've ended our traditional lectures with Lynsey now, and this last one was somewhat helpful. It covered a few points that I could apply to my Who Framed Roger Rabbit themed essay, but nothing overly helpful like last week. The presentation was more so on how animation tells a story visually, but not handy in my essay exploring how animation is used in conjunction with the plot itself. If anything, this session was most helpful in solidifying that, now everything's concluded with lectures, I should really sit down and put my points down in concrete.

Sketchbook project this week has been a bit down, a combination of being busy with the work this week and, being completely honest, a lack of motivation. I feel like I burnt myself out on it the past two weeks getting things done, that I've subconsciously gotten tired of the sketchbook. I still pick it up every so often for a little scribble on the page, but not much else. I'm sure the motivation will come back.

Monday, January 21, 2019

CGI - INTRODUCTION

This session was our introduction to the program Maya.

Maya, also known as Autodesk Maya, is a program used to make CGI models, games and animations. 


Image result for maya
(An example of the Maya UI - credit: The Gnomon Workshop)

For this session, we learnt some of the basics of Maya's workspace, how to model simple shapes and elements, and how to animate them.

In Maya, you create things out of primitive shapes; cubes, spheres, cylinders, etc. Through various means of manipulating faces, edges and vertices, you can change how they look and how they go together. We started out by using the sphere shape to start to create a classic-looking flying saucer.

First, we took a sphere and scaled it up on all factors, essentially just making it a bigger sphere. From there, we brought one of the dimensions down, turning it from a sphere into more of a frisbee-like, flatter shape. We had the saucer bit of our flying saucer! 

Next was the main dome of the saucer. That was easy enough; just make a new sphere, scale it up a little bit, and then change it's position so that it's in the right place on the saucer. We then used that sphere as an anchor point for smaller domes surrounding it. Using a duplication shortcut combined with the new anchor point, Maya was able to create a circle of domes surrounding the anchor point.

At that point, there was a complete UFO! Then came the animation.

I'd never crossed paths with CGI animation, so I was genuinely surprised to find out that animating in that medium worked exactly how I thought it would. You set up individual keyframes, adjusting the object's position, scale, rotation, etc. And then Maya fills in the movements between! It's similar to how Premiere Pro and After Effects deal with moving elements, but I never expected it of a professional CGI program. This is called interpolation, where the frames between keyframes are approximated by the program.

While learning how to do basic animation, we found out how to create nested animations within them. For this, we decided we wanted the UFO to continually spin as the main movements went on. For this, we went into the object's own timeline, and found it's Y axis control. In it's line graph, we changed the value so that it would continue going upwards. Through that, it allowed the UFO to just keep spinning!

After we finished up with the UFO, we were let loose with trying to model a cow all on our own. We were allowed to have fun with it, so I made a cow using some ridiculous proportions and shapes. And also a top hat.

(I dubbed him "Mr. Bull")

So we had a UFO, and we had a cow. The last thing we modelled was a tractor beam. While making it, we learned how to apply colours to our models (which we then added to the cow and UFO). Flat colours are called lamberts, and shiny textures are called phongs. A bright blue lambert was applied to the tractor beam, and then it's opacity was brought down by about 50% to give it some transparency. 

The tractor beam was then parented to the UFO; this means that the two travel together, but can still be manipulated individually. 

Now we had all the elements to make our animation; a UFO abducting a cow. This meant manipulating all 3 objects created, but at different times. I started by blocking out the UFO's movements. The animation starts and ends with it, so it'd be a good indication of how long things needed to last for. The UFO stays still for about 60% of the time it's on screen, sharing 20% on each end for it's moving in and out of shot.

Next was the tractor beam. It had it's scale manipulated to get bigger, remain big for a couple of seconds, then recede back. I had it's anchor point set to it's top point, so when it got bigger, it was growing out from that point.

The cow was next to be animated, which would then be animated in the timespan that the tractor beam was onscreen. It needed to get dragged up by the beam, and disappear into the ship. I did that, and added a slight change in rotation to give off a more floaty look.

I added one final touch of my own... I noticed that there was a text tool, so I wanted to add a little "moo" coming from the cow. So I did that.

And the animation was done!


Overall, I'm really happy with both the animation and the introduction to Maya in general! Being completely honest, I was not expecting myself to find Maya as (for lack of a better term) easy and user friendly as it was; I actually understood it, unlike After Effects. Everything is laid out how I would've expected it, and things do what you want! It shares traits to other programs I've dabbled with, but in a way that makes the translation from 2D to CGI usage easy to understand! While I'm happy with the animation that came out of this session, I think I want to go back and add in more details; model in a barn, a background, and more cows to make a more interesting animation!